Wednesday, November 27, 2013

Thanksgiving Wishes

Let me in, let me in!  It's getting cold out here!

I hope all of you and your families have a wonderful Thanksgiving!  
Stay safe out there!

Wednesday, November 20, 2013

Dear Garden, You Might be in Trouble..

Sorry to break it to you, dear future Garden, but some possible, uh, challenges have been spotted...


I have spotted Bunnies nibbling away at the wildflowers in the yard on several occasions.  The reason this particular Bunny looks so happy?  He knows a Garden is coming.


Yep, that would be a Deer.  Right in the back yard.  Eating something. (Please let it not be the blueberry bushes I planted back there!)


And the neighbor has seen a Groundhog on several occasions.
That might explain all those large holes in the ground back there.   

She's also found a 4 foot long Snake skin.  In a tree.  
(Yes, I know that the snake is actually not harmful to you, dear Garden, but it's still a challenge.  Have you ever wanted to know how little gardening gets done when the now fearful Gardener is constantly looking up?)


Just what we needed.  More Rodents.  This one seems to be of the Chipmunk variety.

And.. 
oh, no, could it be?
...


MUWAHAHAHA!

Aaahhhhhh!  It's the New England division of Squirrels!!!  

We're in trouble..


(for more information about these seemingly innocent Squirrels, please read my Mission Impossible: Squirrel Division post.)

Tuesday, November 12, 2013

All the Dirt on Sassafras

In 1603 the first Europeans sailed up the Piscataqua River, exploring what is now the border between New Hampshire and Maine.  This was a commercial venture, as they were specifically searching for something they knew they could sell for a lot of money...
Sassafras leaves turning color for fall
Back when, Sassafras root extract was considered to have great medicinal value as a cure for fevers, rheumatism, and STD's such as gonorrhea and syphilis (you don't often think of people back in the 1600's having these problems, do you?).  Several Native American tribes used Sassafras medicinally, and when colonial Americans brought this knowledge back to Europe, it became quite the medicinal fad.  For a short time Sassafras was the second largest export from colonial America, behind tobacco.

I have several of these native Sassafras trees in my backyard.  Anyone want to pay some big bucks for them?
Sassafras has been found to have some analgesic and antiseptic properties.  Some people still drink sassafras tea for such things as gastrointestinal problems and for use as a diuretic, and some also use it topically to sooth skin irritation.  However, the research from the 1960's found that very large amounts of safrole, which sassafras oil is largely made up of, caused cancer and permanent liver damage in laboratory rats.   So don't ever be a laboratory rat.  (Oh, and you might want to drink that tea in moderate amounts..)

The Sassafras tree is also interesting in that it has three different shaped leaves on the same tree!
(photo source - Augusta, GA government website)
High doses of safrole are also hallucinogenic, which is probably why it is used in the making of the drug MDMA, more widely known as 'Ecstasy' and 'molly' (thank you, Miley Cyrus, for bringing that to my attention).  Thus the transportation of safrole is closely monitored internationally.

The Sassafras trees in my yard are just for ornamental use, really!
Sassafras root used to also be the main flavoring for root beer before its ban by the FDA.  Root beer affectionados still make it themselves from natural Sassafras extract that has all dreaded safrole removed.  Or they make it from scratch from Sassafras roots.  (You can find a recipe here.) Sassafras is also used in Creole cooking.  FilĂ© powder, which is made up from the dried, ground up Sassafras leaves and doesn't contain very much safrole, is used as a thickening seasoning for gumbo.  

Makes you want to go out and smell some Sassafras, doesn't it?


While I admire the Sassafras for its rich history, its varied uses, and its fragrant leaves and wood, I have to admit that as a gardener I really love these native trees for a totally different reason.

They're just really pretty trees.

the interestingly contorted branches of a Sassafras tree

Tuesday, November 5, 2013

Designing a Northeastern Garden

When we finally moved into our new house in Massachusetts three months ago, it didn't seem much like a home at all.  One of the problems was that the yard was completely bare in the front.  No foundation plantings, no grass, nothing.  On the positive side, I got to design my garden from scratch!

Ack, my house is naked!!  Quick, throw a few shrubs over its foundation!
Step 1:  Trees, Shrubs, and Hardscaping

The first step in designing a garden is to put in what is called the 'bones' of the garden - the main structures that really anchor all the other smaller plantings.  That usually means trees, shrubs, and hardscaping.  

In addition to trees and shrubs, I have two light posts and a few boulders in my garden.  One great thing about the Northeast - boulders are plentiful!  (Farmers would probably disagree about this being a great thing.)
I designed this garden with the winter season in mind.  It's easy to make a garden look good in the summer up here in the Northeast when everything is blooming, not so easy to make a winter garden look good - and all I hear from people up here is how long the winter is going to be!  So I focused on plantings that would look good all year long, such as... 

Evergreens:


On one side of our yard we put a Blue spruce.  The silvery blue of the needles match our house perfectly, and the birds love it!


Vanderwolf's Pyramid Limber Pine and a Blue Atlas Cedar are planted on the other side of my house.  I love how these two evergreens have totally different looks.

...and Foundation Plants with Winter Interest:

Deciduous trees and shrubs going in my yard needed to have either interesting bark or winter berries that would look good in winter!


Winterberry Hollies were planted on either side of my porch, and a River Birch tree with its fabulous light-colored, peeling bark was planted at the corner.


I also planted some Variegated Red Twig Dogwood shrubs.  In summer they have variegated, gray-green colored leaves that look quite pretty with our house color.  The leaves then turn a fabulous pink in autumn before dropping off to reveal bright red stems for winter!

Step 2:  Deciding on Color and Gardening Style

After putting in the main landscaping, it was time to take advantage of the end-of-the-season sales and get some smaller shrubs and perennials for the garden.  But what color scheme should I go with?  My previous Red House perfectly set the stage for a cheerful front garden filled with lots of yellow blooms accented by oranges, reds, whites, and purples.  

But my new house is a subdued grayish green with a hint of blue (yeah, I have no idea what color to describe it as).   However, it really lends itself to a.... pastel-colored English-cottage theme!

We're going pink and pastel here, very different for my garden!
For this theme I had to have roses, of course, though being the lazy gardener that I am, they had to be very hardy and non-fussy.   I found several 'The Fairy' Roses on sale, which are impressively still blooming despite our recent cold snap!  I also picked up several 'Magnus' Purple Coneflowers, several different shades of Salvia (I'm a sucker for salvia), Gaura, and some Great Blue Lobelia, among others.

The Great Blue Lobelia is perfect for a wet spot in the yard.
Step 3:  Plant what you love!

I know I had a pastel theme decided on, but I just couldn't resist putting some cheerful, bright yellow flowers somewhere in the garden.  Next to the garage side door I planted a little clump of Willow Leaf Sunflowers, which are fabulously supposed to get around 6 to 8 feet tall.  I can't wait.

I have big dreams for you, baby clump!
Step 4:  The fun has only just begun!

I still have a lot to fill in.  Bulb planting has started, and I'm already thinking about what plants to start from seed for next year.  Ah, such planning!  Hopefully it will carry me through the long, cold winter that everyone keeps warning me about!


But I must say, with the new beds and the landscaping 'bones' of the garden put in, my new house looks much more like a home!

Sunday, October 27, 2013

Guest Blogger: Vintage Wall Art

Now that I've moved to up north to Massachusetts, I've found that the gardening season is compressed.  There seems to be a lot to do in a short amount of time before winter comes!  I have been busy the last few weeks making beds, buying and planting all those end-of-the-season discount plants, mowing down all the brush in our detention pond, and starting the planting of the bulbs.

But, believe it or not, this blog post is not about my new garden.  We've also been working on some interior projects, and I have my first guest blogger to talk about one of them.  This blog is brought to you by a very special guest blogger - Mr. Red House himself!

Building a vintage looking Wooden Wall Art

When finishing our house we found that we had a pretty blue living room with a very very blank wall on it.

See the huge blank spot on the left!

We had seen a very pretty but oh so expensive wood art that we liked at Pottery Barn.  

This can be yours for only $399 at Pottery Barn!
Lucky for us we felt very crafty!  We had some leftover flooring from the construction of the house and decided to put it to some good use.

There was more, but I forgot to get a better picture of the huge stacks of flooring!

Step one was layout out a pattern on the floor, making sure we had enough wood.

Once we had it all laid out we decided to paint each of the pieces pretty colors. Initially a good stain seemed the ideal choice, however we discovered that the cool colored stains were outdoor only and they would not be safe to have indoors.  Instead on towards paint we charged!  

We lucked out and Lowes was having a sale on sample cans of paint!   Six different colors were selected.

Foam brushes are an awesome invention!

Now we've got paint, brushes and a pattern laid out, the next step is to carefully separate the pieces so each one could be individually painted and reassembled correctly.

We are going for a rustic theme to the house, so I explained to the kids to go easy on the paint so that the wood grain would show through.  Somehow in that explanation any large blob of paint spilled or other mistake became "rustic!"

You won't believe the debates over who painted which color and piece of wood

Finally finished painting and let our disassembled wooden jigsaw puzzle dry.


Then we ran into our first challenge.  We are dealing with hardwood flooring that has awesome tongues and grooves, however without a backing it won't stay together that well.  After some discussion and an emergency trip to Lowes to get a large sheet of plywood and lots of wood glue, the project continued!


Here we are gently laying the pieces on the plywood.  Each piece was held down with wood glue and my handy dandy nail gun!  The weight of the pieces was sufficient to adhere to the glue.  I put in two nails per piece of flooring just as an insurance policy.

Here is is all glued and nailed down.  Final size was about 6 feet wide by 4 week tall AND about 200 lbs!


I adore how the wood grain turned out!

We then did some heavy hand sanding for that weathered and rustic feel.  I originally tried a power sander, but found a simple hand sander with 100 grit sandpaper let us gently weather the wood strips to give a nice aged look.


Now for the second challenge.  The entire piece weighed about 200 lbs!  I suddenly realized I hadn't planned how to put this up on the wall so that it does not come crashing down.  After extensive research, French cleats were the answer.  French cleats are two pieces of metal that form a rail and can hold significant weight.  Here's a Home Depot one that holds a good amount.  

While the weight was fine, I sadly could not use it because our wall studs are 24" apart and these hangers are only 18" wide.  I didn't feel safe unless I had at least two studs.


That's a 5 foot pieces of aluminum up there spanning 3 studs.  I ended up mounting it to three studs and using 4 additional wall anchors.  I went for overkill, but boy is that thing heavy!

Here it is in all of its mounted glory!

Cat not an official part of art display
Our large blue wall now has some rustic charm!


Now I've spent an entire blog talking about something non-plant related, unless you count the wood which is very plant related!  So I leave you with the obligatory pretty flower picture.

I have no idea what this is, but it's pretty.

Wednesday, October 9, 2013

Did You Win Any Brownie Points?

Okay, if you couldn't figure out what country I've been in recently from the picture clues in my last post, this last clue should give it away:

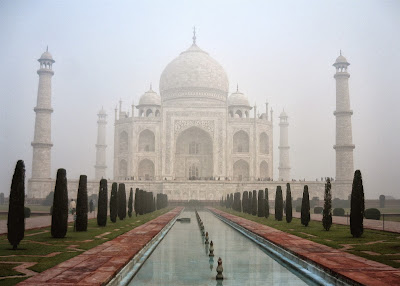
The Taj Mahal, built by Emperor Shah Jahan in the 1600's as a tomb and testament of love to his wife, Mumtaz Mahal, who died giving birth to her 14th child.
I have been in the beautiful country of India!

Brownie points* to those who guessed it correctly!  This was my second trip to India.  I first visited India in 2005 and was fortunate enough to be able to tour some parts of the country then. We visited the city of Agra during my first trip (extra brownie points to Denise for correctly guessing that!), which is where the Taj Mahal is located, as well as Agra Fort, where the photo of this fabulous puzzle lawn came from.

puzzle lawn inside a courtyard of Agra Fort
In addition to fabulous lawns, I couldn't help but be impressed by the stunning architecture of Agra Fort.


The Agra Fort has a long and colorful history - records from 1080 AD mention it being captured by an invading force!  After several other turbulent government turnovers, it was eventually rebuilt in the 1500's by the famous emperor Akbar the Great.  He rebuilt it using red sandstone, the reason it is also known as 'the Red Fort of Agra'.


Agra Fort also plays a small part in the tragic love story surrounding the Taj Mahal. Shah Jahan, the ruler who built the Taj Mahal, ended up being imprisoned at the fort by his own overly ambitious son. He allegedly spent his last days laying in the tower there that overlooked the Taj Mahal, gazing at his monument to his beloved wife.

Musamman Burj, the tower which offers the best views of the Taj Mahal from the fort
On my first trip to India, we also visited the beautiful state of Kerala, located on the southwestern tip of India (brownie points to Usha for identifying that location!)  I think you can see why it is sometimes referred to as 'God's own country'.


Besides being a prime destination for tourism, Kerala is also where many spices are grown and produced, such as pepper, cinnamon, nutmeg, and cardamom.  Rice, coconuts, cashews, coffee, and tea are also exported from there.

This is a tea plantation.  Workers make their way throughout the rows of bushes, handpicking the leaves for tea.
At some point I would love to take my kids to see all of these beautiful sites.  This trip to India, however, we mostly stayed with Mr. Red House's grandparents and relatives, who live in the city of Bangalore.  We did take one other little trip, but you will have to wait until the next post to find out more about that...


*Sorry, brownie points are still not redeemable for actual brownies..