Friday, February 17, 2012

Woodpeckers of North Carolina

In honor of the annual Great Backyard Bird Count, which starts today, I am showing off some of my favorite birds that visit the Red House Garden - woodpeckers.  Several varieties of these striking birds live around the area and frequent my bird feeders.  There are eight (or hopefully nine) species of woodpeckers found in North Carolina, and five of those I have seen here at the Red House.  Despite their loud drumming in the early morning on my metal gutters in spring to attract mates and announce their territory, I still enjoy seeing them!

Red-bellied Woodpecker
Melanerpes carolinus

Male Red-bellied Woodpecker
The Red-bellied Woodpecker was the first woodpecker I noticed here.  In the picture above you can just make out the reddish patch on his lower belly for which this woodpecker is named.  I first met him when I opened up the blinds to a window upstairs only to be face-to-face with the startled bird!  He studied me for a long minute, only to go about his business of hiding seeds under my eaves.  This male is quite bold and enjoys all of my bird feeders - he is not very picky!

Female Red-bellied Woodpecker
The female looks much like the male except she does not have red on the very top of her head, only on her nape and at the base of her bill.  The female here is much shyer - if she notices me taking pictures, even from inside the house, she will fly away! 

Interesting fact: A Red-bellied Woodpecker can stick out its tongue almost 2 inches past the end of its beak, and its saliva is also sticky, thus making it easier to snatch insects from deep tree crevices.

Red-headed Woodpecker
Melanerpes erythrocephalus

Red-headed Woodpecker
The Red-headed Woodpecker is unmistakable with its beautiful red head.  It is impossible to tell if this one is a male or female, though, as the genders look the same.  This one only started visiting a few weeks ago, but now that it has found my bird feeder filled with sunflower chips, I see it every day.   In general, however, this species' numbers have been on the decline due to loss of habitat and other factors.

Interesting fact:  Like the Red-bellied Woodpecker, the Red-headed Woodpecker will store food in crevices of bark or cracks in wood; however, this is the only kind known to cover the food up with bark or wood.  Smart thinking! 

Downy Woodpecker
Picoides pubescens

Male Downy Woodpecker
The Downy Woodpecker is the smallest woodpecker in North America, measuring about six inches long.  They are named for the patch of downy feathers between their bill and their forehead.  They are frequent visitors of my suet feeder.  

Female Downy Woodpecker
The male has a red patch on the back of his head, while the female does not.  Downy Woodpeckers are often found in mixed species flocks of birds - they blend right in with the other backyard birds, they are so small!

Northern Flicker
Colaptes auratus

Male Yellow-shafted Northern Flicker
Unlike other woodpeckers, the Northern Flicker usually prefers to find food on the ground, lapping up insects such as ants with its long tongue.  I only see them occasionally on my suet feeder - they are more likely to be foraging on the ground nearby. 

The female Northern Flicker does not have a black 'moustache'.
There are two races of Northern Flickers. The yellow-shafted form found in the Eastern US has yellow shaft feathers, yellow on the underside of its tail feathers, red at the nape, and the males have a black moustache.  The red-shafted form in the West has red shaft feathers, red on the underside of the tail feathers, and the males have a red moustache.

Yellow-bellied Sapsucker
Sphyrapicus varius

Yellow-bellied Sapsucker
This migratory Yellow-bellied Sapsucker was actually hanging out in the wooded lot next door.  They prefer sap, insects, and berries to bird feeders.  Here is a much better picture from the Smithsonian Migratory Bird Center website:

Yellow-bellied Sapsucker - Smithsonian
Sapsuckers drill holes in trees in order to drink the nutritious sap and eat the insects that are attracted to the sap.  That is not always good news for the tree - however, many other animals benefit from this.  Animals such as bats, porcupines, squirrels, hummingbirds, and many other birds will come to drink the sap as well as eat the lured insects.

Most woodpeckers just drill holes to get insects and don't really harm trees.  They prefer to feed from dead trees or ones that already have an insect problem.  Sapsuckers, on the other hand, will repeatedly drill on the same tree to keep the sap flowing, so if it's one you want to keep, you need to take preventative measures.

Most woodpeckers prefer to nest and feed in dead trees such as this one.
Those are the five types of woodpeckers observed here at the Red House.  The other woodpeckers found in North Carolina are:
the Hairy Woodpecker, which looks like a larger version of the little Downy Woodpecker, the Pileated Woodpecker, which is very large with a fabulous red crest on its head, and the endangered Red-cockaded Woodpecker, which prefers to nest in groves of old longleaf pines and thus have declined with the destruction of their habitat.

Pileated Woodpecker
picture from Wikipedia

There is also, very hopefully, one other species of woodpecker that has lived in North Carolina in the past, the Ivory-billed Woodpecker.  It is possibly extinct due to destruction of habitat.  There were some possible sighting of this woodpecker in Arkansas and Florida several years ago.  So if you see one during the Great Backyard Bird Count, or at anytime at all, take a picture and alert some ornithologists!

Ivory-billed Woodpecker 
picture from Wikipedia
 And don't forget, you can participate in the Great Backyard Bird Count
anytime between February 17 - 20!

What birds are usually in your backyard?

Wednesday, February 15, 2012

An Early Spring?

Has Spring come so early to North Carolina?
February here in Raleigh:

Top: emerging leaves of Clematis 'Guernsey Cream', Dutch crocus
Middle: Treefrog, Crocus 'Ard Schenk', Johnny Jump-up


Still I think Winter has not yet conceded defeat...

this weekend's touch of frost

In the spring I have counted 
one hundred and thirty-six different kinds of weather
 inside of four and twenty hours.  
-Mark Twain


Is spring emerging so early elsewhere?
To see what is going on in gardens around the world,
visit Garden Bloggers' Bloom Day over at May Dreams Garden's blog.

Sunday, February 12, 2012

Making Terrariums - So Simple a Child Could Do It

What is a gardener to do in the wintertime when he or she needs their plant fix?
Start an indoor garden, of course! 


Terrariums are all the rage right now, and as they seem like a possible solution to my houseplant-munching cat, I enjoyed making a couple of them this winter.

Terrarium: a glass container, chiefly or wholly enclosed, for growing and displaying plants

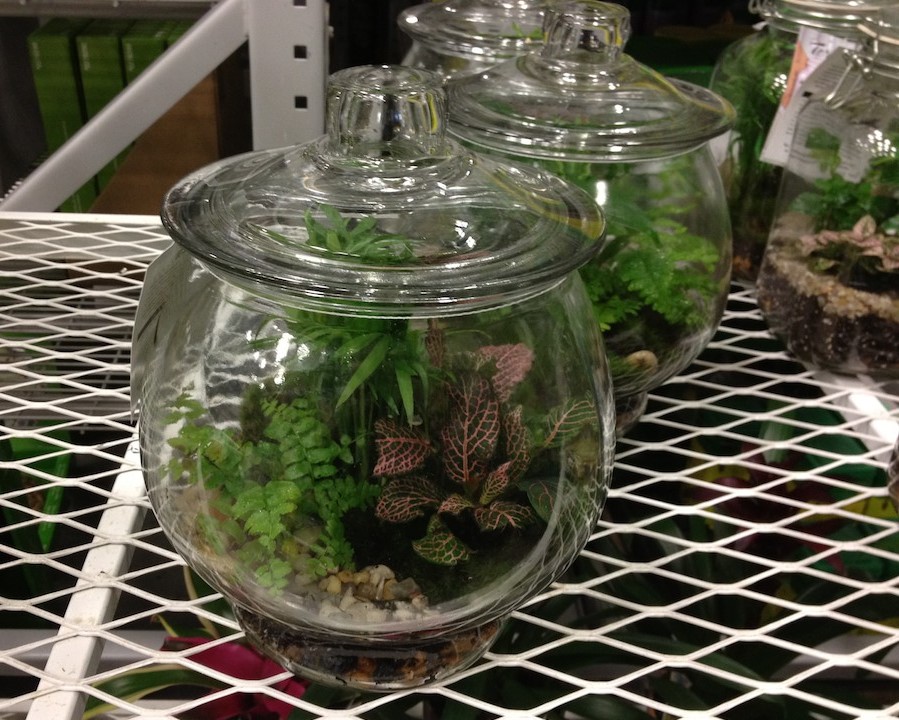
Terrariums being sold at the hardware store
Now that they are so popular, it is a lot easier finding a variety of little plants for terrariums that were previously not available locally.

Fittonia albivenis (white), Palm seedling, Hypoestes (red), Fern
 Of course, as soon as my kids saw the first terrarium I made, they wanted to make one, so out came the old goldfish bowls out of storage. 
(RIP Fishy 1 and Fishy 2)

How to Make a Terrarium

Step 1: Choose a glass container, either open or closed, and clean thoroughly.  Choose your container with your plants in mind - some plants enjoy the high humidity of a closed terrarium, while other plants need more air circulation.

Step 2:  Put clean rocks, sand, or marbles in the bottom for drainage.  

This was actually my kids' favorite step - going outside and collecting rocks for their terrarium kept them quite busy for a good hour or two!  (This is of course much easier when you have an extremely mild winter and no snow..)

My more decorative river rocks
Step 3:  If you have a closed container, put a few spoonfuls of activated charcoal over the rocks to filter the air and prevent the buildup of bad microorganisms and odors.  You can find it at the pet store in the aquarium section (sometimes it will be labeled as activated carbon).

Step 4:  If desired, put a layer of moss or a mesh to prevent the soil from falling down into your decorative rocks.  You can use sphagnum moss or landscape fabric or any sheer fabric.  I used a strip of sheet moss I had, turned upside down.


Step 5:  Plant your plants, using a light potting soil.

Hmm... this one is still going to have to go up high out of reach of the cat..
Some common plants for terrariums include Fittonia albivenis (also known as Nerve Plant), certain types of Begonias, orchids, ferns, Peperomia, and Hypoestes (also known as Polka Dot Plant).  Make sure to choose a grouping of plants that all prefer the same light and humidity levels. 

Clockwise from top left:  Fittonia albivenis (pink), Fittonia albivenis (small and white), Palm seedling, Hypoestes (red), Fern
Step 6:  Add any decorative items you would like.  My four-year-old added rocks and glitter hearts to her terrarium.

My four-year-old's terrarium: Fittonia albivenis (pink), Fittonia albivenis (red)
My two year old added the rest of her rocks on top and left me to finish with sheet moss - she just wanted to go outside and collect more rocks!

My two-year-old's terrarium: Fittonia albivenis (pink), button fern
Step 7:   Lightly water your plants (the lightly part being the hardest step for kids - I suggest a spray bottle) and set in a location that gets the proper amount of light.   Most terrarium plants like a decent amount of indirect light but not direct light. 

Water the terrarium every once in a while when the soil starts getting dry.  If you have a closed terrarium, you will need to let it air out every few weeks and be careful not to overwater (especially with little kids that looove to water).

My four-year-old's terrarium
As you can see, making a terrarium is so simple even a child could do it!
Now keeping it alive, that's another story...

Wednesday, February 8, 2012

Birds vs. Aliens

They are coming...

Who?
An alien invasion is coming...

Sound the alert!!
Fly away

Fly, fly!
Get out of the open

Uh, oh..
Hide if you can

Can they see me?
 Because they are here

I can't look!
 STARLINGS.

WE'RE HERE...
 European starlings have come to invade the Red House Garden.

Oh crap..
 They will eat all your food..

GET AWAY ALL YOU LITTLE BIRDS!  THIS FOOD IS OURS!
..steal all your nesting sites,
and sometimes even kick out existing eggs or babies,
contributing to the decline of several of your native American species.

Oh that's low..
They will also poop all over your baffle.

MUWAHAHA!!
What can you do about this alien invasion?

We should call those Mission Impossible squirrels!
Remove any food that they are attracted to, such as mixes with millet and millo, or use only bird feeders that little birds can get into.  Keep the ground under the bird feeders clear of seeds.

WHY ARE THERE NO SEEDS HERE?!
If you provide bird houses, make sure the entrances of your bird houses are too small for these aliens.  If you provide large boxes for birds such as Northern flickers, watch over them to make sure that Starlings do not move in.

I still think we should fight!
Hopefully then your aliens invasion problems will be solved..

I'M NOT SCARED OF NO SQUIRREL!  THIS PLACE JUST DOESN'T HAVE ANY GOOD FOOD!

..and they will fly away.


Sunday, February 5, 2012

How to Do an At-Home Soil Test in Only 16 Steps

 Step 1.  Buy a Soil Testing Kit


 Step 2.  Read the directions:

1. Spread out collected soil on a piece of paper and pick out leaves, stones, or sticks.
2.  Use the back of a plastic spoon to crush any lumps bigger than a pea.
3.  Let soil dry overnight.
4.  Follow all directions about mixing distilled water, soil, and provided tablets in the little test tubes.
5.  The water in the test tubes will magically turn colors and then you can easily determine everything about the soil.

Step 3.  Get a trowel full of dirt from a few inches down in the ground, dump it on a piece of paper, and throw it in the spare room overnight to dry.


Step 4.  Start crushing the dry dirt with the plastic spoon.  Realize that the dirt was full of ants. 


Step 5.  Clobber Gently remove ants with plastic spoon.

*Images have been censored.*

Step 6.  Spend lots of time trying to crush dried pieces of clay with plastic spoon. 


Step 7.  Actually follow the directions and mix distilled water, soil, and little tablets according to instructions on soil kit.  Compare colors to chart.


Step 8.  Realize that my soil actually is acidic.  Throw out the cheap, lying ph tester that has been telling me all this time that my soil is alkaline. 


Step 9.  Wonder why two of the tubes stayed clear and did not change color at all.

Uh, aren't there supposed to be some color in those two clear test tubes?
Step 10.  Redo the whole test with different dirt and get the exact same results, including the two clear test tubes.

*See image above*

Step 11.  Suspect that the soil test kit I just recently bought was in fact already expired.  Go back to store and get different soil test.


Step 12.  Follow all the directions exactly this time, and remove leaves, sticks, ants, etc., from dirt and crush it before putting in the spare room to dry. 


Step 13.  Mix soil with distilled water, fill test tubes to correct levels, add tablets, shake, pray that colors appear this time.


Step 14.  Celebrate that there is some color in the test tubes.  Stop celebrating when I realize that the colors tell me that there are very few nutrients in my soil.

Step 15.  See if I can convince Mr. Red House to increase our budget for compost and soil amendments.

*pretty please?*

Step 16. Go make sure there are no more ants in the spare room that my parents will be staying in next weekend...


Thursday, February 2, 2012

Of January Delights and Disappointments

January can be a very grey, dismal month.  
The best things in the garden during wintertime bring color..


The house came with these Nandina domestica 'Gulf Stream' bushes, and I must say I love them. 


Some nandinas can be invasive, but the 'Gulf Stream' cultivar does not set fruit.  It is supposed to grow about three feet high and two feet wide.  So far mine have stayed pretty little between the deer and the heavy clay. 


Another delightful winter plant is the Coral Bark Japanese Maple.


When the sun comes up over the horizon in the morning, the fiery red bark almost glows.


And let's not forget the delightful flowers that came up this oddly warm January!


Between the Nandinas and the early blooming Crocus 'Ard Schenk', my front yard is looking pretty good..


Now on to the other side of the house and one of the most disappointing parts of the garden in January:


The big long perennial border in the back is so blah, that this is the only January photo I could find of it.  I obviously didn't want to look at it long enough to take a picture, even though I'm usually in garden paparazzi mode.  

It is surprisingly partially green thanks to the mild winter, however it desperately needs some structure. Several birches are located to the left of the picture, however I feel that there needs to be a small tree or giant installation art or tacky pink flamingo or something to break it up.  It's such an odd site that it's always been a problem child for me (long and narrow, sloping both ways, on a thick vein of clay, grumble, grumble).  Any suggestions are appreciated and welcome!

Let's go back to the front yard!

Say cheese!

For other gardeners' January highs and lows, you can visit the Bumble Lush Kitchen Garden.